


How to Dual Boot Windows 7 or 8 with Windows 10 Technical Preview
Windows operating system supports dual-booting OS – two different operating systems where user can choose which OS to start on system boot up. With latest Microsoft upcoming Windows 10 operating system added lots of features, including Start menu with live tiles, improved command prompt, multi-desktops for multi-tasking, and etc. If you intent to test Windows 10 Technical Preview on top of current existing Windows 7 or 8 or run it in a virtual machine within existing operating system to make the PC a dual boot system.

Here’s how to install Windows 10 Technical Preview over current operating system (Windows 7, 8 or 8.1) so that can select which system to boot up on machine start-up.
Note: Before start, make sure at least 20GB of free storage space on internal drives and 4GB USB drive.
Step 1
- Download and install the Windows 10 preview ISO file. Here how to download and install Windows 10 Technical Preview.
- Next, download and install the Windows 7 USB/DVD Download Tool.
Note: this software will burn the Windows 10 installer to a USB stick so that can use it like a bootable DVD.
Step 2
- Insert a USB Flash drive into PC. And then launch Windows 7 USB/DVD Download Tool.
- Select the ISO file by hitting the Browse button and click Next.
- Choose USB device by click the USB device button.
- Select the USB drive insert to PC and then click Begin copying button.
- Click Erase USB Device and click OK to confirm if prompted. The tool will then take a few minutes to copy files to the USB drive to create bootable USB drive.
Step 3
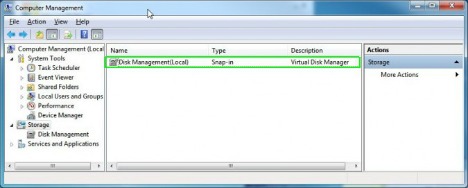
- Next, go to the desktop control panel > Administrative tools > Computer Management > Storage and then select Disk Management to navigate to the disk management tool on PC.
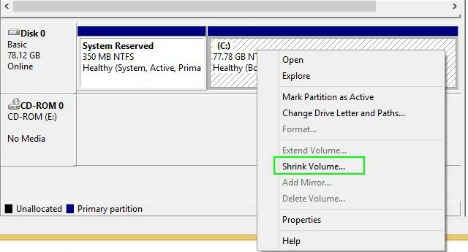
- Right click on C Drive and select Shrink Volume in the bottom window pane.
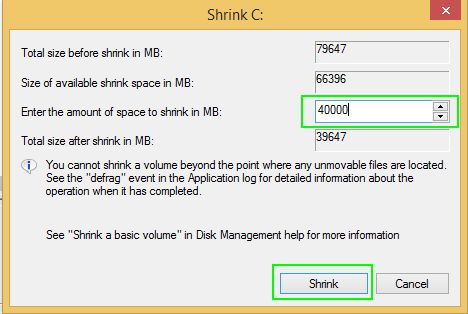
- Enter the amount to shrink (min 20GB), which will be the size for Windows 10 drive. Click Shrink to allocated space of PC hard drive.
- Right click on the unallocated space and select New Simple Volume.
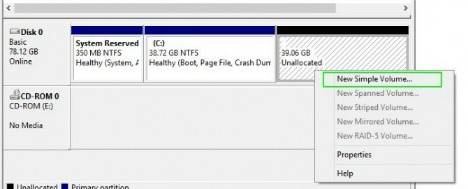
- In new simple volume wizard, click Next > Next > Next to assign a drive letter > Select “Do not format this volume” and then click Next.
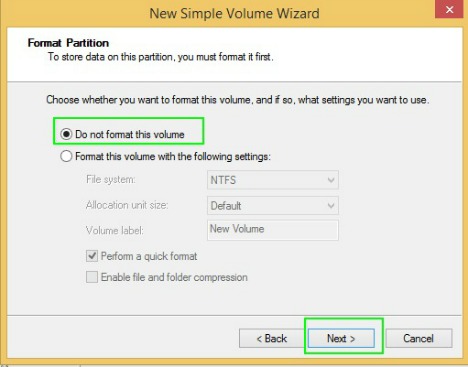
- Click Finish to completing the new simple volume wizard.
Step 4
- Reboot the PC. Hit F11 or F12 as soon as PC reboots in order to select your boot device.
- In Windows setup, click Next and follow onscreen to install the Windows.
- Select the partition that created which marked as “unallocated space” and click Next.
Note: Windows will take a few minutes to copy files. - Once finished copy files, PC will reboot and display a boot menu.
Step 5
- After PC reboot, in boot menu select Windows Technical Preview. It will copy more files and then reboot again.
- Select Windows Technical Preview a second time, after the system reboot.
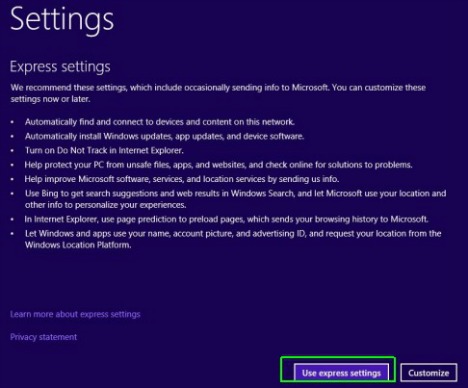
- In express settings, click “Use express settings.”
- Sign in to Microsoft account or create a new account.
- Verify account by enter the email address and then key in the code that received from Microsoft emails.
- Select “Set this up as a new PC instead” so that can default install of Windows 10. Click Next to enable OneDrive.
Windows will take a few minutes to finalize your settings. Windows will present with the same boot menu and given the choice of existing Windows or Windows 10 Technical Preview.


Recent Articles
- How To Download HBO Shows On iPhone, iPad Through Apple TV App
- Windows 10 Insider Preview Build 19025 (20H1) for PC Official Available for Insiders in Fast Ring – Here’s What’s News, Fixes, and Enhancement Changelog
- Kaspersky Total Security 2020 Free Download With License Serial Key
- Steganos Privacy Suite 19 Free Download With Genuine License Key
- Zemana AntiMalware Premium Free Download For Limited Time