


How to Disable and Turn Off UAC in Windows 8
User Account Control (UAC) is a feature in Windows 8 that can prevents unauthorized changes of the computer by informing users when a program makes a change that requires administrator-level permission. The user interface of User Account Control (UAC) settings in Windows 8 has changed to let users more easily access, more user control, and more user friendlier approach. In Windows 8, the UAC has a slider bar which allows users to configure and select which level of notification (and hence protection against unauthorized and malicious access) they want. If you do not want this features then you can disable the UAC, but the wording ‘disable’ or ‘turn off’ is no longer available. Here how to disable the User Account Control in Windows 8.
Method 1: Disable or Turn Off UAC (User Account Control) in Control Panel
- To user Control Panel to disable UAC in Windows 8, there are several methods to access the User Account Control settings page:
- Go to the Search box and type “Change User Account Settings.
- Go to Start Menu -> Control Panel -> User Accounts and Family Safety -> User Account.
- Click on User Account Control, select the link under: ‘Change User Account Control Settings’.
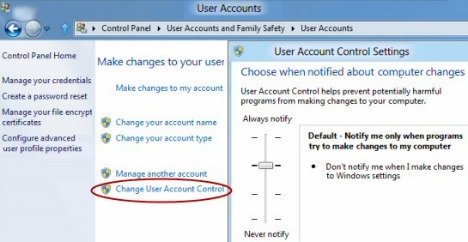
- Slide the slider bar to the lowest value (towards Never Notify), with description showing:
- Notify me when:
– Programs try to install software or make changes to my computer
– I make changes to Windows settings. - Notify me only when programs try to make changes to my computer.
(But) Don’t notify me when I make changes to Windows settings. [Default level] - Never notify me when programs try to install software or make changes to my computer.
- Notify me when:
- Slide the slider downwards and choose “Never notify me”, and then click OK to make the change effective.
- Restart the computer to turn off User Access Control.
Method 2: Disable UAC with Registry Editor (RegEdit)
- Move the cursor to the bottom-right and then select the search box.
- In the search box, enter the regedit under the application tab and click on the window that is shown.
- After click on regedit, you will get a UAC Window. In this Window, click on Yes Button.
- In the Window that is shown, you will see the “Registry Editor”.
- Navigate to the following registry key:
HKEY_LOCAL_MACHINE\Software\Microsoft\Windows\CurrentVersion\Policies\System - Locate the following REG_DWORD value:
EnableLUA - Set the value of EnableLUA to 0 instead of 1 under value data for disabling the User Account Control, and then click on OK Button.
- Exit from Registry Editor and restart the computer to turn off UAC.
Method 3: Disable UAC via MSCONFIG
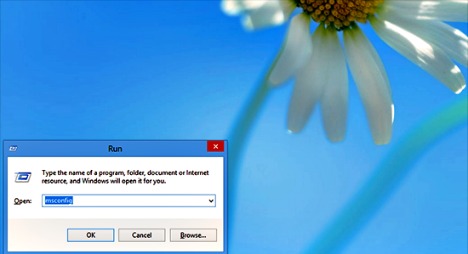
- Press Windows Key+R, type msconfig in search box and then click OK button.

- In tools tab, choose Change UAC Settings and click Launch button.
- Slide the slider downwards until “Never notify me” to disable the UAC and then click on the OK Button.
Method 4: Turn Off UAC Using Group Policy
- Press Windows Key+R and then enter GPedit.msc in search box to run Local Group Policy editor. (Or gpmc.msc to run Group Policy Management Console for AD-based domain GPO editor).
- Navigate to the following tree branch:
Computer Configuration -> Windows Settings -> Security Settings -> Local Policies -> Security Options - In GPMC, browse to the required GPO which is linked to the domain or OU where the policy wants to apply.
- Locate the following policy in the right pane:
User Account Control: Behavior of the elevation prompts for administrators in Admin Approval Mode
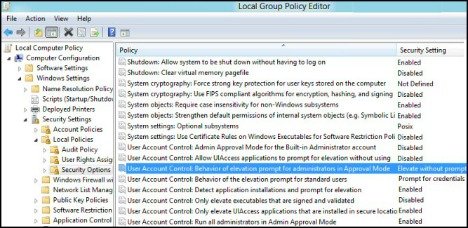
- Set its value to Elevate without prompt.
- Locate the following policy in the right pane:
User Account Control: Detect application installations and prompt for elevation
Set its value to Disabled. - Locate the following policy in the right pane:
User Account Control: Run all administrators in Admin Approval Mode
Set its value to Disabled. - Locate the following policy in the right pane:
User Account Control: Only elevate UIAccess applications that are installed in secure locations
Set its value to Disabled. - Exit the policy editor and reboot.


Recent Articles
- How To Download HBO Shows On iPhone, iPad Through Apple TV App
- Windows 10 Insider Preview Build 19025 (20H1) for PC Official Available for Insiders in Fast Ring – Here’s What’s News, Fixes, and Enhancement Changelog
- Kaspersky Total Security 2020 Free Download With License Serial Key
- Steganos Privacy Suite 19 Free Download With Genuine License Key
- Zemana AntiMalware Premium Free Download For Limited Time