How to Remove Recycle Bin Icon in Windows 7
By default, Windows 7 users will notice the Recycle Bin icon appear automatically on the desktop. It allows users to have quick and easy access to the bin to clean/restore files. Having said that, some users might not like the idea and think it is an eyesore. Hence, if users prefer, they can easily hide the Recycle Bin icon from the desktop. With some simple setting, users will be able to remove the Recycle Bin icon from the desktop. However, this approach will not stop the Recycle Bin from functioning or prohibiting other people from access it via the Recycle Bin folder itself.
To hide or show the recycle bin from the desktop, users can take the following steps to make some simple changes to the default setting:
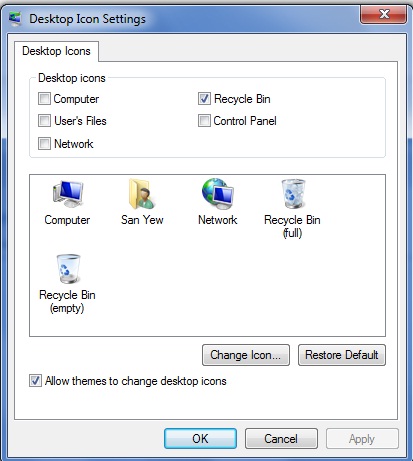
- Go to Start->Control Panel->Appearance and Personalization. On the right pane, click on to the “Personalization” item. Under “Personalization”, select “Change desktop icons”. (Alternately users can go to the search box in the Start Menu and type “Change desktop icons”).
- In the “Desktop Icon Settings” Windows, under “Desktop Icons” to uncheck the Recycle Bin check box to remove the Recycle Bin icon completely from the desktop; or to check the Recycle Bin check box to display the Recycle Bin icon on the desktop.
- Click OK to complete the process.

If the above steps are taken, users will successfully remove the Recycle Bin icon from the desktop. However, some users might not think it is enough to hide the icon from the screen. Some users might want it to be completely removed as well from Windows Explorer. To completely remove the Recycle Bin icon from Windows Explorer, users can make the changes from the Local Group Policy Editor. (Refer to our previous post on how to open the Local Group Policy Editor).
In the Local Group Policy Editor, go to User Configuration\Administrative Templates\Desktop in the left pane. In the right pane, right click on “Remove Recycle Bin icon from desktop” and click on Edit. In the window prompted, check the boxe “Not Configured” or “Disabled” to display the Recycle Bin icon; or check the box “Enabled” to hide the Recycle Bin. Once it is done, click ok and restart the computer to activate the setting.
Check out more Windows 7 usage guides.
Recent Articles
- How To Download HBO Shows On iPhone, iPad Through Apple TV App
- Windows 10 Insider Preview Build 19025 (20H1) for PC Official Available for Insiders in Fast Ring – Here’s What’s News, Fixes, and Enhancement Changelog
- Kaspersky Total Security 2020 Free Download With License Serial Key
- Steganos Privacy Suite 19 Free Download With Genuine License Key
- Zemana AntiMalware Premium Free Download For Limited Time


