


How To Create OS X Yosemite From Bootable Portable USB Flash Drive
OS X Yosemite is released and available to free update for Mac users. Users can download OS X Yosemite from the Mac App Store free of charge to update and install to PC. Most people will choose to install or update direct to Mac, but still have some people may opt to make or create a bootable OS X Yosemite USB drive to install OS X Yosemite on PC systems that support booting up from a USB drive. Furthermore, update from USB drive is also faster comparing to update online.

Although previous method used to make bootable drives of OS X Lion and Mountain Lion installer did not work for OS X Mavericks and Yosemite, but users can follow the step-by-step guide below from the procedures to prepare an external USB bootable drive to copying the OS X Yosemite installation setup files over.
Step-by-Step Guide on How to Create OS X Yosemite Bootable USB Flash Drive
Before start, please make sure Mac with ‘Install OS X Yosemite.app’ file downloaded from Mac App Store.
- Prepare a USB flash drive with at least 8GB storage capacity.
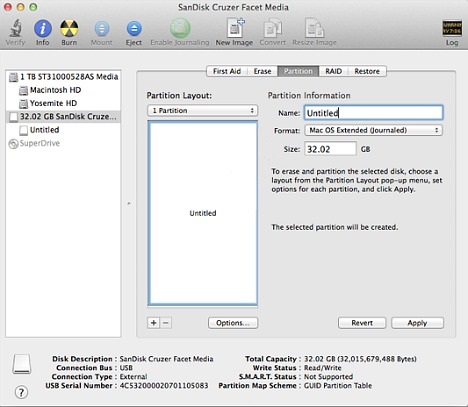
- Launch Disk Utility, select the flash drive from the left sidebar, and then select “Erase” tab from right, and click on “Erase…” button to format the USB drive.
Note: Make sure the name is set to ‘Untitled’; format is set as ‘Mac OS Extended (Journaled)’. - Next, select ‘Partition’ tab.
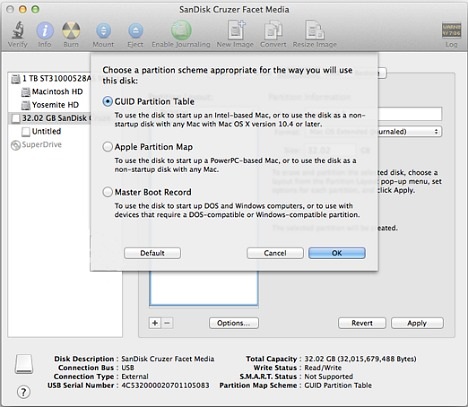
From “Partition Layout” dropdown menu select “1 Partition”. Click on “Options” and make sure “GUID Partition Table” is selected as partition scheme. Once done, click on “Apply” button to create partition.
Note: Make sure the name is set ‘Untitled’, not ‘Untitled 1’ or anything else.
- Download OS X Yosemite from Mac App Store.
- Once downloaded, quit the installer and make sure OS X Yosemite installer that downloaded in Applications folder with its default name “Install OS X Yosemite.app”.
- Start Terminal, type in the following code, and hit Enter:

Terminal will now prompt to enter OS X password. Fill in the password and then click “Enter” to continue the process.
Note: It will take around 10 to 20 minutes or so for the process to complete, DO NOT remove USB drive until Terminal shows “Done”.
The USB drive based OS X Yosemite installer is now ready for clean installation.


Recent Articles
- How To Download HBO Shows On iPhone, iPad Through Apple TV App
- Windows 10 Insider Preview Build 19025 (20H1) for PC Official Available for Insiders in Fast Ring – Here’s What’s News, Fixes, and Enhancement Changelog
- Kaspersky Total Security 2020 Free Download With License Serial Key
- Steganos Privacy Suite 19 Free Download With Genuine License Key
- Zemana AntiMalware Premium Free Download For Limited Time