Enable Lock Pages in Memory to Prevent Database Paging to Disk
Lock Pages in Memory is a Windows security setting policy that determines which accounts can use a process to keep data in physical memory, which prevents the system from paging the data to virtual memory on disk, directly improves the response time speed of the process, especially data-intensive program such as SQL Server database management system, as access time from RAM is definitely faster than disk I/O.
Lock Pages in Memory option privilege must be enabled to configure Address Windowing Extensions (AWE) which allow a 32-bit software application to access more physical memory than it has virtual address space. Both settings are normally used to optimize Microsoft SQL Server database server running on Windows 2000, Windows Server 2003 and Windows Server 2008 by allowing the user account running SQL Server to load the whole process in physical memory without using any paging file flow over to disk.
Note that exercising or enabling this privilege could significantly affect system performance by decreasing the amount of available random access memory (RAM). So, a system is recommended to have large memory size, typically bigger than 4 GB. Which mean that on 32-bit operating system, PAE has to be enabled, although neither Lock Pages in Memory nor AWE depend on PAE. Beside, on 32-bit operating systems, setting this privilege when not using AWE can significantly impair system performance. However, on 64-bit operating system, although not required, it’s recommend to lock pages in memory.
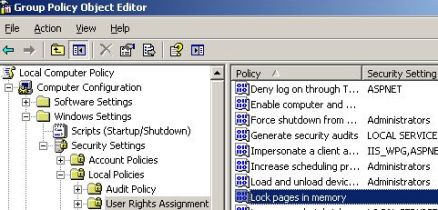
To enable Lock Pages in Memory setting, system administrator has to use the Windows Group Policy tool (gpedit.msc) to enable this policy for the account used by SQL Server.
- On the Start menu, click Run. In the “Open” box, type gpedit.msc.
- On the “Group Policy” console, expand Computer Configuration, and then expand Windows Settings.
- Expand Security Settings, and then expand Local Policies.
- Select the User Rights Assignment folder.
- In the right details pane, double-click Lock pages in memory.

- In the “Local Security Policy Setting” dialog box, click Add.
- In the “Select Users or Groups” dialog box, add an account with privileges to run sqlservr.exe (e.g. NetworkService).
Recent Articles
- How To Download HBO Shows On iPhone, iPad Through Apple TV App
- Windows 10 Insider Preview Build 19025 (20H1) for PC Official Available for Insiders in Fast Ring – Here’s What’s News, Fixes, and Enhancement Changelog
- Kaspersky Total Security 2020 Free Download With License Serial Key
- Steganos Privacy Suite 19 Free Download With Genuine License Key
- Zemana AntiMalware Premium Free Download For Limited Time


